
If you were to ask non-sailors what they know about sailboats, you would likely receive an answer like: “They have sails to make the boat go and ropes are used to control the sails”. While this is a very rudimentary definition, this is answer is NOT wrong: sails are controlled using ropes (also referred to as “lines”) to harness the power of the wind to make the boat move through the water. This section focuses on the ropes used on a sailboat and several of the most commonly used knots and their uses.
Recommended reading before moving on: review the Running Rigging diagram in Terms & Terminology.
Every line (aka rope) on a sailboat usually has a specific purpose. To avoid confusion, each line has been assigned a unique name that often matches to the purpose. For example, a halyard is used to raise and lower sails, while a sheet is used to adjust a sail by either pulling it in or letting it out. Right away, we already now know the difference between a halyard and a sheet. But is that enough? In the case of a boat with a single sail, yes – since there is only 1 sail, there will only be one halyard and one sheet – but on boats with more than one sail, we need to be more specific.
Sailboats with 2 sails will have a mainsail as the primary and, most often times, a jib as the second sail. Because there are 2 sails (or more), the terms we use onboard have to be more specific than just halyard and sheet. (If the captain says, “pull in the sheet” or “loose the halyard”, the crew won’t know with certainty which sheet to pull or which sail to lower.) The solution is to use the name of the sail as a prefix to the line’s purpose: “main” (sail) + halyard = main halyard; jib + halyard = jib halyard. Sheets work the same way: mainsheet and jib sheet. (If the boat has a 3rd sail, like a spinnaker, the same formula applies: spinnaker halyard and spinnaker sheet.) Using these terms, all the ambiguity is removed. When the captain says “pull in the mainsheet and lower the jib halyard”, the crew knows exactly what to do. Listed below are some other lines that you may encounter on a sailboat:
- Outhaul – line used to tighten the foot of the mainsail on the boom. The outhaul is attached to the mainsail’s clew and pulls towards the aft end of the boom. Used to ‘depower’ the sail as the wind gets stronger.
- Boom vang – line used to stop the back of the boom from rising up or to pull the boom down. The tighter the boom vang (or ‘vang’), the less twist there will be in the top 1/3 of the mainsail.
- Cunningham – line used to pull the luff of the mainsail tighter after the sail has been fully raised (by the main halyard). Used to depower the sail as the wind gets stronger.
- Painter – line tied to the bow of the boat; used either for docking or when being towed.
Now that we understand the basic uses of ropes on board our sailboat, lets shift our attention to the knots we should know and when to use them.
Knots
While there are entire books written on the subject of knots, about 90% of the time, sailors will use only 4 or 5; the rest are either for edge cases or for show. Here are the 5 most common and useful knots to master:
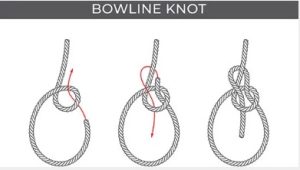
- Bowline (“bow-len”) – A bowline can be used either to form a loop in the end of a line or to tie a line around almost anything. Lots of knots cando the same things, but what’s special about a bowline is that it doesn’t slip and doesn’t tighten under load nearly as much asother knots, making it easyto untie. Those qualities make bowlines ideal for towing and similar applications where lines are under sustained tension.
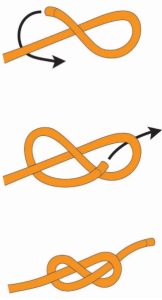
- Figure 8 – A figure 8 is a type of “stopper” knot. It is used to prevent a line, like a sheet, from pulling all the way through a block (pulley), a rope clutch or some other piece of hardware. Having a stopper knot in a line can be the difference between momentary inconvenience and major calamity. Because the knot prevents a line from coming undone, the skipper or crew simply has to grab the bitter end and pull to restore control.
- Cleat Hitch – There is, in fact, a right way to tie a dock line to a cleat. There are also a whole lot of wrong ways. Most of the wrong ways also work reasonably well, but if you’re leaving your boat for an extended period of time or in challenging conditions, do it right.
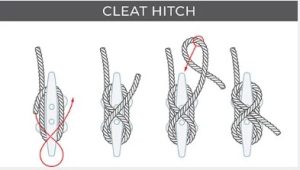 Things to know about the cleat hitch:
1. If the line is at an angle to the dock, go around the far side of the cleat first.
2. Take at least half a turn around the base of the cleat before going over the middle (the cross over). For a more slip-resistant hitch, take a full turn around the base before starting the first cross-over.
3. A single figure-eight locked with a half-hitch is plenty. The excess line should be coiled next to the cleat; it should NOT be wound around the cleat again and again – all this accomplishes is to increase the time it takes to get the line off the cleat.
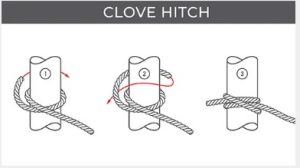
- Clove Hitch – the clove hitch is quick way to tie off to a rail, bar or post. They have the added advantage of being easily adjustable, which makes them ideal for things like hanging fenders from a lifeline. Note that clove hitches can slip — especially when not under tension – however, this risk can be mitigated by adding a couple half hitches around the standing part with the tail.
- Square Knot – Also known as a reef knot, the square knot is a simple binding knot used to secure a rope or line around an object. It is primarily used to join two ropes of equal diameter. It is not reliable for heavy loads or critical safety situations.
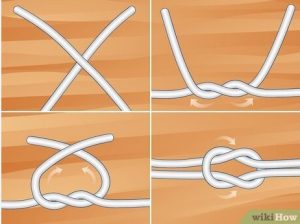
If the diagrams above were not helpful, don’t fret – there are 100s if not 1000s of web pages and videos online about these and many other knots. (And there are lots of books available as well.) Simply type “how to tie <name of knot>” into your browser and have fun with the results.